7 Best Video Editing Tips to Skyrocket Retention
Looking for the absolute best video editing tips to completely transform your workflow this year? You have landed in exactly the right place to upgrade your post-production process.
The standard for what makes a highly engaging video has skyrocketed in 2026. Viewers across competitive markets like the USA and UK have incredibly short attention spans, and platform algorithms are more demanding than ever. Simply chopping up some clips and slapping a crossfade between them just does not cut it anymore. Whether you are running a professional digital agency, managing international SEO campaigns, or producing massive three-hour ambient projects, efficiency and retention are everything.
You need to stop wasting hours struggling with sluggish timelines and start working like a top-tier post-production professional.
To help you get there, we have put together a massive, highly scannable guide. These are advanced, real-world video editing tips designed to bridge the gap between amateur cuts and high-end, high-retention storytelling. Applying these specific video editing tips will drastically reduce your export times, eliminate those terrifying missing file errors, and keep viewers glued to their screens for hours.
Table of Contents
- Introduction
- Tip 1: Let AI Handle the Boring Stuff
- Tip 2: The Magic of Proxy Workflows for 4K
- Tip 3: Build an Authentic Audio Experience
- Tip 4: Organize Your Messy Bins First
- Tip 5: Keep Eyeballs Glued with Dynamic B-Roll
- Tip 6: Stop Guessing Your Colors (Correction vs. Grading)
- Tip 7: Master the Art of Platform Pacing
- Frequently Asked Questions (FAQ)
- Final Thoughts
7 Pro Video Editing Tips to Transform Your Workflow
1. Let AI Handle the Boring Stuff
If there is one fundamental concept you take away from this guide, let it be this: your time is your most valuable asset. The most practical video editing tips you can adopt right now revolve entirely around time management and working smarter, not harder.
We are living in an era where artificial intelligence can do the heavy lifting for you. This allows you to focus on the creative direction rather than the tedious mechanical clicks.
Automating the Cut
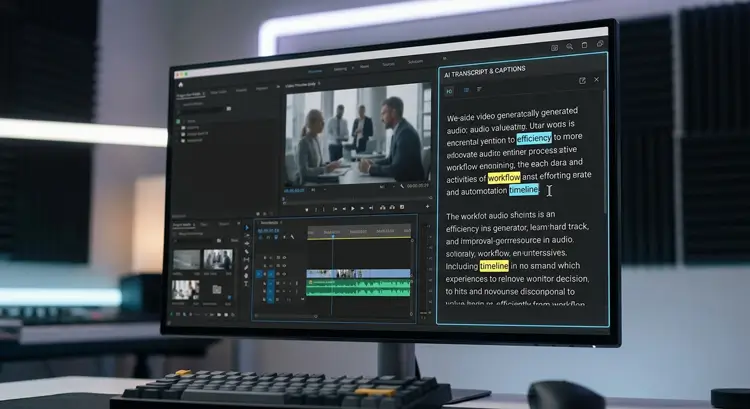
When utilizing industry-standard software like Adobe Premiere Pro, you should absolutely be implementing text-based editing into your daily routine.
- Text-Based Workflows: Instead of manually scrubbing through hours of raw footage, the software listens to your audio and generates an accurate written transcript. You can edit your timeline exactly like a text document. If you delete a sentence in the text panel, it instantly cuts that clip out of your timeline.
- Silence Removal: We all naturally say “umm,” “uhh,” and pause to think while speaking. Manually slicing those tiny gaps out of a timeline is soul-crushing work. Now, you can click one button, and the AI will ripple-delete every single patch of dead air in seconds.
Embracing these time-saving video editing tips frees you up to focus purely on the fun stuff: creative pacing, visual hooks, and narrative storytelling.
2. The Magic of Proxy Workflows for 4K
Let’s talk about hardware frustration and timeline lag. One of the most overlooked, yet absolutely vital, technical video editing tips is understanding how to properly use proxies.
Here is the reality: editing massive raw 4K, 6K, or 8K footage directly on your timeline is going to cause your computer to lag. Your playback will stutter, your frames will drop, and your software will likely crash. This happens even if you have a ridiculously expensive, top-tier computer. The file sizes are simply too dense to process in real-time, especially if you are working on a massive 3-hour nature soundscape or a long-form documentary.
Keeping Your Timeline Smooth
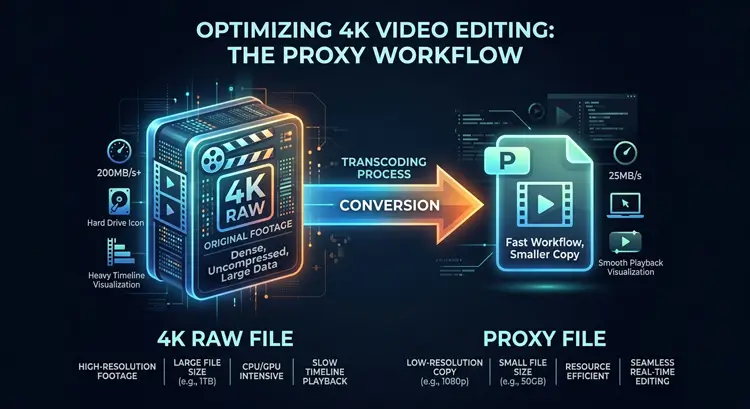
Proxies are the ultimate solution to slow rendering and stuttering playback. A proxy is simply a low-resolution, lightweight copy of your original heavy footage.
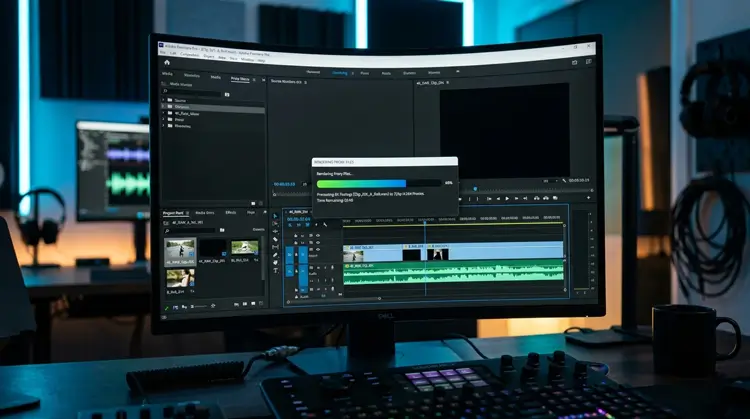
- Non-Destructive Editing: When you set up a proxy workflow, your software temporarily swaps out the massive 4K files for these tiny 720p or 1080p files. Suddenly, your timeline becomes buttery smooth. You can scrub back and forth with zero lag.
- Automated Ingest Presets: When you are finally ready to render and export your masterpiece, the software automatically swaps the high-quality 4K files back in.
- Background Rendering: If you want to implement the best video editing tips used by elite agencies, set up an “ingest preset” in Adobe Media Encoder. This tells your software to automatically create these lightweight proxies in the background the exact second you drag new footage into your media pool.
3. Build an Authentic Audio Experience
Here is a harsh truth in the video production world: viewers will forgive grainy, slightly out-of-focus visuals, but they will immediately click away if your audio sounds like it was recorded inside a tin can. Therefore, some of the most impactful video editing tips you can learn actually have nothing to do with video at all—they are entirely about mastering audio.
Layering Your Soundscapes
Getting professional audio means you have to build an immersive acoustic environment, which is especially critical if you are targeting high-retention audiences in the USA and UK who expect premium quality.
- Volume Balancing: Make sure your main dialogue track is balanced, usually sitting nicely between -6dB and -12dB on your audio meters.
- Audio Ducking: Smoothly lower your background music to around -25dB whenever someone speaks so the voices are never drowned out.
- Psychoacoustic Design: If you want to apply truly advanced video editing tips, you need to understand the psychology of sound. Intentionally place continuous ambient “room tone” or nature soundscapes beneath your tracks. By playing this consistently under your dialogue, it acts as an acoustic glue. It masks harsh cuts and creates a subconscious feeling of relaxation, drawing the viewer deeper into your flow.
4. Organize Your Messy Bins First
We know, folder structure sounds incredibly boring. However, getting your assets organized is hands-down one of the most crucial video editing tips on this entire list. Messy bins are the number one cause of lost footage, unlinked audio, and that terrifying red “Media Offline” screen that haunts editors’ nightmares.
Never dump your video files directly onto your desktop or into one giant, unnamed folder. You will save yourself hours of future frustration by establishing a strict architecture before you even open your software.
The Agency Standard Architecture
Applying these organizational video editing tips guarantees that if you ever need to revisit a project six months later, every single asset stays perfectly linked.
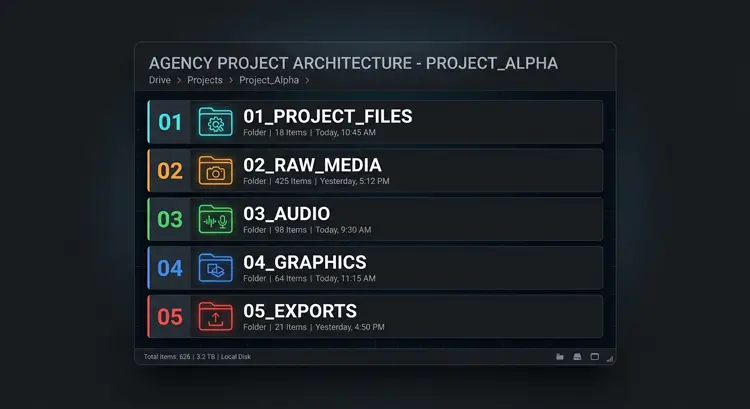
- 01_PROJECT_FILES: This is where your actual Premiere Pro or DaVinci save files go.
- 02_RAW_MEDIA: Drop all your camera footage here. Break it down into subfolders for A-Roll (main talking head) and B-Roll (supplementary footage).
- 03_AUDIO: Keep your music tracks, ambient soundscapes, sound effects, and voiceovers isolated here.
- 04_GRAPHICS: Store your logos, text overlays, and After Effects compositions.
- 05_EXPORTS: This is where your final, rendered videos live for client delivery or YouTube upload.
5. Keep Eyeballs Glued with Dynamic B-Roll
A static, unmoving shot of someone talking to a camera gets boring very quickly. To keep modern audiences engaged, visual video editing tips require you to constantly visually prove what the speaker is saying. B-roll (supplementary footage) is how you build immediate credibility.
Bridging Premiere and After Effects
In 2026, simply slapping a generic, static stock video over your timeline is not enough. You need to master dynamic visual integration.
- Dynamic Linking: Blend your footage with custom motion graphics. Using dynamic linking between your main editing timeline and a compositing program like Adobe After Effects allows you to build living, breathing visual elements that update in real-time without needing to render intermediate files.
- Visual Contrast: Mix high-end motion graphics with raw, authentic-looking B-roll. The contrast between highly polished animations and grounded, realistic footage creates a visual texture that is incredibly engaging.
- The 3-Second Rule: Of all the visual video editing tips available, remembering to change the on-screen visual element (even just a slight punch-in zoom) every 3 to 5 seconds is the most reliable way to boost your retention graphs.
6. Stop Guessing Your Colors (Correction vs. Grading)
Have you ever wondered why your videos look muddy, or why skin tones look orange in one shot and green in the next? The most unbreakable color-focused video editing tips mandate a very strict, non-negotiable separation between color correction and color grading. They are two completely different steps.
The Science Behind the Look
If you ignore these specific video editing tips and try to slap a creative LUT (Look-Up Table) onto uncorrected, raw footage, your final export will look amateurish and highly inconsistent.
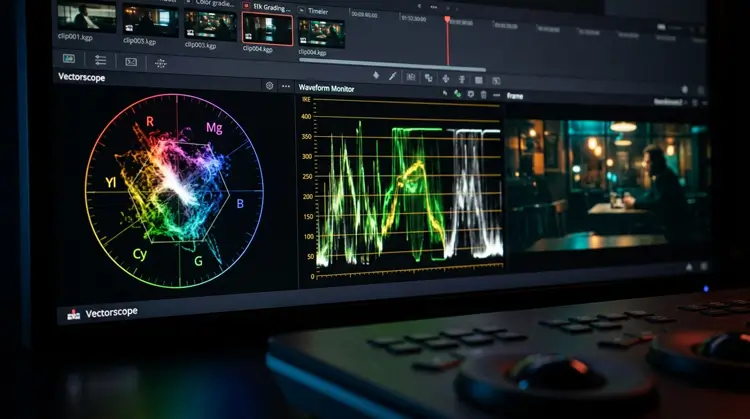
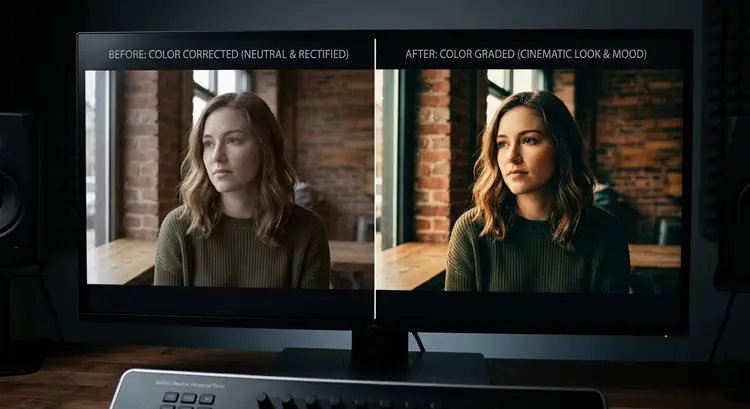
- Step 1: Color Correction (The Math): This is purely mathematical. You have to stop trusting your naked eye and your uncalibrated computer monitor. Professionals use software scopes—specifically the Waveform monitor and the Vectorscope. You use these tools to ensure your brights hit exactly 100 IRE and your darks sit at 0 IRE, effectively neutralizing your white balance and securing perfect skin tones.
- Step 2: Color Grading (The Art): Only after your image is mathematically perfect do you move on to grading in software like DaVinci Resolve. Grading is the fun, creative part where you apply a cinematic “look,” adjust the mood, or apply a LUT to give the video its final, polished aesthetic. Always fix the math first, then paint the picture.
7. Master the Art of Platform Pacing
The rules that govern a massive 3-hour relaxation broadcast absolutely do not apply to a 30-second vertical Reel. The data is brutal: a massive percentage of mobile viewers will swipe away before they even reach the 3-second mark. Therefore, your platform-specific video editing tips must adapt to the algorithm you are targeting.
Adapting to the Algorithm
You have to visually stimulate the viewer based on where the video will live.
- Short-Form Vertical Editing: When editing vertical content, you need to create a rapid visual hook instantly. Use sudden jump cuts to punch in closer on the speaker’s face. Add micro-zooms that slowly push the camera in to create subconscious tension. Implement visual sound effects—like a subtle “pop” when an image appears. These audio-visual pairings intentionally reset the viewer’s attention span.
- Long-Form Flow: Conversely, if you are editing ambient or long-form content, the video editing tips reverse. You want long, slow, seamless cross-dissolves. You want the audio to carry the weight of the production, ensuring the visual cuts are virtually invisible to the viewer so they remain in a deep state of flow and relaxation. Edit with the final destination in mind.
Frequently Asked Questions (FAQ)
Final Thoughts
Taking your content to the next level does not happen by accident. Mastering these professional video editing tips will drastically reduce the amount of time you spend frustrated by technical issues, while simultaneously elevating the quality, look, and feel of your final digital assets.
The post-production industry is evolving incredibly fast. The key to maintaining a competitive edge is letting software automation handle the tedious, heavy lifting. Let your computer generate the proxies, transcribe the audio, and delete the silences. Your job is to focus purely on the creative narrative, the digital strategy, and the overall emotional impact of the media.
Implementing video editing tips like structured folder architecture and mathematically sound color correction takes a little bit of practice to get used to, but the results will speak for themselves when you look at your soaring audience retention graphs. Start by applying just one or two of these techniques to your very next project, and watch your efficiency and content quality multiply!
